
Reshaping, 4D to 2D#
See also: Reshaping 4D images to 2D arrays.
import numpy as np
Revision on 3D#
We often find ourselves doing complicated reshape operations when we are dealing with images. For example, we may find ourselves reshaping the first few dimensions, but leaving the last intact.
Let’s start with a familiar 3D array:
arr_3d = np.reshape(np.arange(24), (2, 3, 4))
arr_3d
array([[[ 0,  1,  2,  3],
        [ 4,  5,  6,  7],
        [ 8,  9, 10, 11]],

       [[12, 13, 14, 15],
        [16, 17, 18, 19],
        [20, 21, 22, 23]]])
As ever, Numpy shows us the array by row, where each row is a 3 by 4 slab of columns by plane. Here is a picture of the same array represented as planes of 2D row by column arrays:
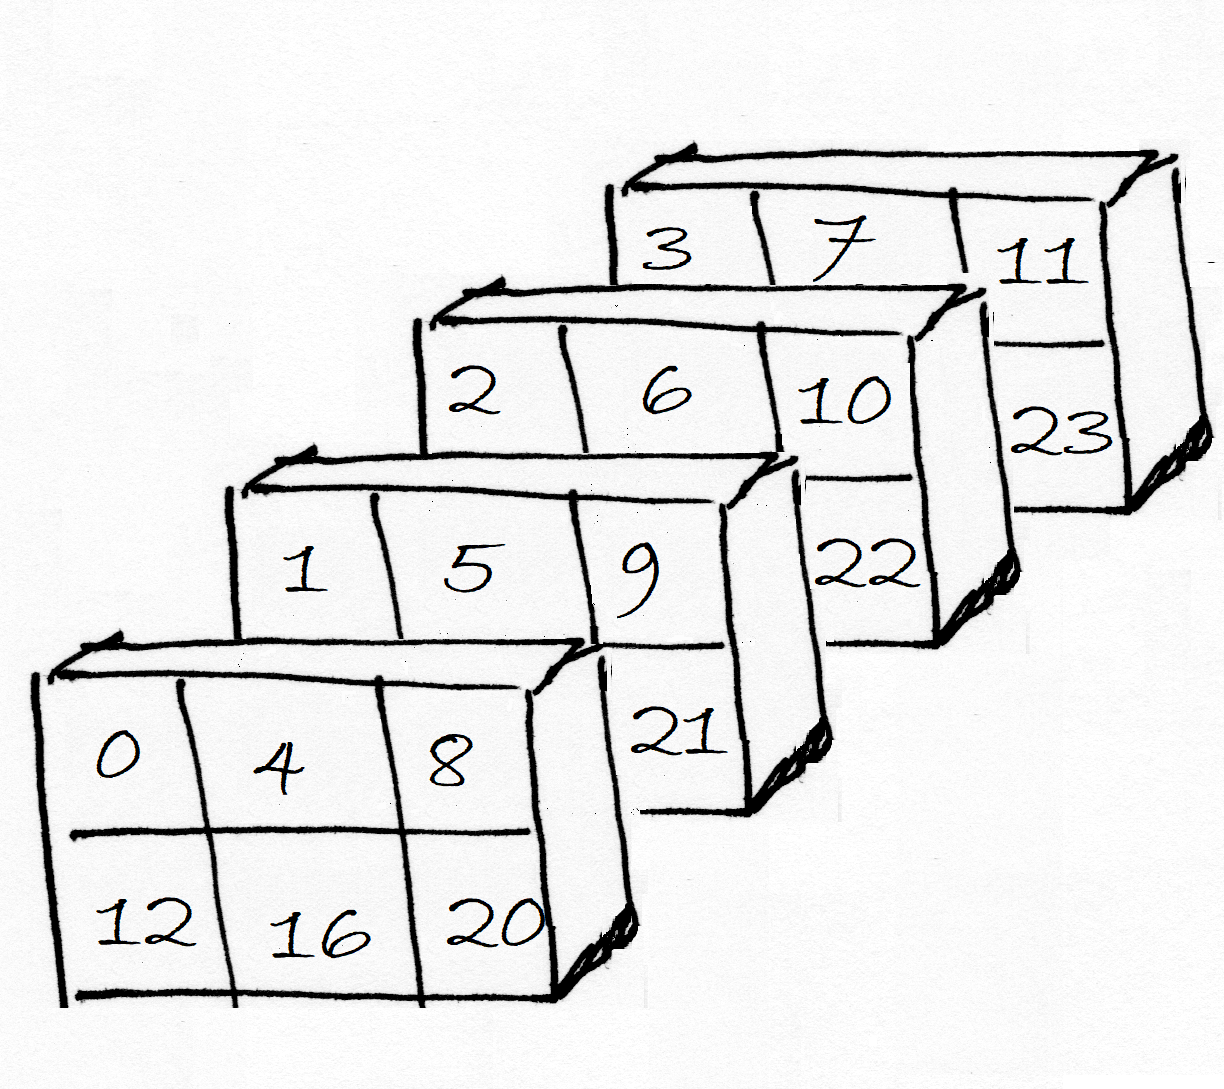
Notice that Numpy has filled in the 3D array in the order last axis to first axis, therefore:
plane, then
column, then
row.
Now imagine that we want to reshape only the first two dimensions, leaving the last the same. This will take us from an array of shape (2, 3, 4), to an array of shape (6, 4). The procedure is the same for all reshapes in NumPy. NumPy makes an output array shape (6, 4), then takes each element over the last dimension in the input, and fills the last dimension of the output, moves one across on the second dimension of the input, then fills a line in the first dimension of the output, and so on.
arr_2d = np.reshape(arr_3d, (6, 4))
arr_2d
array([[ 0,  1,  2,  3],
       [ 4,  5,  6,  7],
       [ 8,  9, 10, 11],
       [12, 13, 14, 15],
       [16, 17, 18, 19],
       [20, 21, 22, 23]])
Notice how Numpy has filled out the two-dimensional array - by getting the data in the order last axis to first axis, so:
plane, then
column, then
row
It therefore gets the original np.arange(24) array, and then sets the
data into the new array in the order last axis to first, therefore:
column, then
row.
See also: Reshaping and three-dimensional arrays.
To 4D#
This kind of operation is commonly used on image data arrays. Here we have
a 4D array from an fMRI run (ds114_sub009_t2r1.nii):
# Fetch the data file to this computer.
import nipraxis
bold_fname = nipraxis.fetch_file('ds114_sub009_t2r1.nii')
# Show the filename
bold_fname
'/home/runner/.cache/nipraxis/0.5/ds114_sub009_t2r1.nii'
import nibabel as nib
img = nib.load(bold_fname)
data = img.get_fdata()
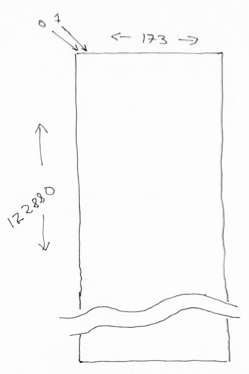
data.shape
(64, 64, 30, 173)
We can think of the 4D array as a sequence of 3D volumes:
vol_shape = data.shape[:-1]
vol_shape
(64, 64, 30)
To get the number of voxels in the volume, we can use the np.prod
function on the shape. np.prod is like np.sum, but instead of adding
the elements, it multiplies them:
n_voxels = np.prod(vol_shape)
n_voxels
122880
Then we can reshape the array to 2D, with voxels on the first axis, and time (volume) on the second.
voxel_by_time = np.reshape(data, (n_voxels, data.shape[-1]))
voxel_by_time.shape
(122880, 173)
This is a useful operation when we want to apply some processing on all voxels, without regard to their relative spatial position.